![]()
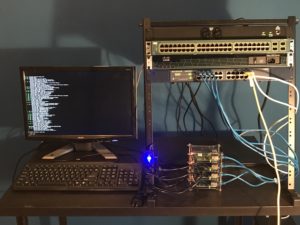
In this tutorial, we will install and configure a Hadoop cluster using Raspberry Pi’s. Our cluster will consists of four nodes (one master and three slaves). Since Raspberries have a low price and Hadoop is open source, together they offer a great resource to learn Hadoop. Make sure you have at least 8 hours set aside to complete this project or split it up into manageable sections.
Items in blue are code to be copied. Items in red are to be changed for your environment. Items in purple are for slave nodes only.
Materials
 4x Raspberry PI 3 Model (4 Core 1Ghz CPU, 1GB RAM)
- 4x 16gb MicroSDHC cards (Sandisk UHS-I 10x)
- 4x micro USB to USB for power
- 4x CAT5e network cables (3feet if possible)
- 1x Powered USB Hub
- 1x 5 or more port switch
- 1x Dogbone case for 4x Raspberry Pi’s (Any case will do)
- Rasbpian Jessie Lite (Linux 4.1.17-v7+)
- Oracle Java java version 1.8.0_65
- Hadoop 2.7.2 (ARM native compiled from source)
For my setup, I ordered the dogbone case, usb hub, microUSB to USB cables, and ethernet cables from Amazon. Since Microcenter is local, I drove over and purchased 4 Raspberry Pi 3’s for $29 each and 4 16gb MicroSDHC cards for $7.99 each. I already owned a 24 port non-managed switch and a 48 port Cisco switch. I also had a spare monitor, keyboard, and HDMI to DVI cable. Once I setup the Raspberry Pi’s using the monitor, I would ssh into each one from a remote computer. The total cost of this project was under $200.
Install Raspbian
Download Raspbian Jessie Lite: https://www.raspberrypi.org/downloads/raspbian/
Write to SD card (use any tool of choice) for windows I use: https://sourceforge.net/projects/win32diskimager/
Plugin in SD card and fire up your PI.
For initial configuration (raspi-config)
- Expand filesystem
- Memory Split Choose 16MB to give as much RAM as possible for Hadoop
- Change the hostname (rpi0)
- Turn on SSH
- Change the root password
Reboot
Basic Pre-installation Configuration
Change Password, Update, and Install Java, rsync, and ant
passwd
sudo apt-get update && sudo apt-get install oracle-java8-jdk && sudo apt-get install rsync && sudo apt-get install ant

Verify that it was installed correctly:
java –version

Run update-alternatives, ensure jdk-8-oracle-*** is selected if you have Java 7
sudo update-alternatives --config java
Setup Connectivity
sudo nano /etc/hosts
10.0.0.100 rpi0
10.0.0.101 rpi1
10.0.0.102 rpi2
10.0.0.103 rpi3
sudo nano /etc/dhcpcd.conf
At the bottom of the file add:
static ip_address=interface eth0
static ip_address=10.0.0.100/24
# static ip_address=10.0.0.101/24
# static ip_address=10.0.0.102/24
# static ip_address=10.0.0.103/24
static routers=10.0.0.1
static domain_name_servers=10.0.0.1
Restart & SSH to new IP
sudo shutdown -r
Login locally or remote
ssh pi@10.0.0.100
Configure Hadoop User
sudo addgroup hadoop
sudo adduser --ingroup hadoop hduser
sudo adduser hduser sudo
logout
Log in as the newly created hduser. From here forward, everything will be executed as hduser. Create SSH pairs keys with blank password. This will enable nodes to communicate with each other in the cluster.
mkdir ~/.ssh
ssh-keygen -t rsa -P ""
cat ~/.ssh/id_rsa.pub > ~/.ssh/authorized_keys

SSH to your node and answer yes when prompted to trust certificate key – otherwise Hadoop will fail to login later.
ssh rpi0
exit

Install Hadoop 2.7.3 for Raspberry PI (ARM)
Ensure you have logged out as hduser and logged in as pi user. (for sudo command below to work properly, as we did above)
Install Hadoop
cd ~/
sudo mkdir /opt (directory may already exist)
cd /opt/span>
sudo wget http://www-us.apache.org/dist/hadoop/common/stable/hadoop-2.7.3.tar.gz
sudo tar xvzf hadoop-2.7.3.tar.gz
sudo mv hadoop-2.7.3 hadoop
sudo chown -R hduser:hadoop hadoop
Give access to hduser
sudo chown -R hduser:hadoop /opt/hadoop/
Add environment variables
sudo nano ~/.bashrc
Add the following to the bottom of the file
# — HADOOP ENVIRONMENT VARIABLES START — #
export JAVA_HOME=$(readlink -f /usr/bin/java | sed “s:bin/java::”)
export HADOOP_HOME=/opt/hadoop
export PATH=$PATH:$HADOOP_HOME/bin
export PATH=$PATH:$HADOOP_HOME/sbin
export HADOOP_MAPRED_HOME=$HADOOP_HOME
export HADOOP_COMMON_HOME=$HADOOP_HOME
export HADOOP_HDFS_HOME=$HADOOP_HOME
export YARN_HOME=$HADOOP_HOME
export HADOOP_COMMON_LIB_NATIVE_DIR=$HADOOP_HOME/lib/native
export HADOOP_OPTS=”-XX:-PrintWarnings -Djava.library.path=$HADOOP_HOME/lib”
# — HADOOP ENVIRONMENT VARIABLES END — #
Check to see if the Hadoop variable has been set
source ~/.bashrc
hadoop version

Setting up the Hadoop Daemon configurations
Add environment variable to hadoop-env.sh
cd /opt/hadoop/etc/hadoop
sudo nano hadoop-env.sh
Add this:
export JAVA_HOME=$(readlink -f /usr/bin/java | sed "s:bin/java::")
export HADOOP_HEAPSIZE=250

Edit Config Files (Only change what’s in red to match your hostname)
cd opt/hadoop/etc/hadoop
sudo nano core-site.xml
<configuration>
<property>
<name>hadoop.tmp.dir</name>
<value>/opt/hdfs/tmp</value>
</property>
<property>
<name>fs.default.name</name>
<value>hdfs://rpi0:9000/</value>
</property>
</configuration>
sudo nano hdfs-site.xml
<configuration>
<property>
<name>dfs.replication</name>
<value>3</value>
</property>
<property>
<name>dfs.webhdfs.enable</name>
<value>true</value>
</property>
<property>
<name>dfs.blocksize</name>
<value>134217728</value>
</property>
</configuration>
sudo nano yarn-site.xml
<configuration>
<property>
<name>yarn.resourcemanager.resource-tracker.address</name>
<value>rpi0:8025</value>
</property>
<property>
<name>yarn.resourcemanager.scheduler.address</name>
<value>rpi0:8035</value>
</property>
<property>
<name>yarn.resourcemanager.address</name>
<value>rpi0:8050</value>
</property>
<property>
<name>yarn.nodemanager.aux-services</name>
<value>mapreduce_shuffle</value>
</property>
<property>
<name>yarn.nodemanager.resource.cpu-vcores</name>
<value>4</value>
</property>
<property>
<name>yarn.nodemanager.resource.memory-mb</name>
<value>768</value>
</property>
<property>
<name>yarn.scheduler.minimum-allocation-mb</name>
<value>64</value>
</property>
<property>
<name>yarn.scheduler.maximum-allocation-mb</name>
<value>256</value>
</property>
<property>
<name>yarn.scheduler.minimum-allocation-vcores</name>
<value>1</value>
</property>
<property>
<name>yarn.scheduler.maximum-allocation-vcores</name>
<value>4</value>
</property>
<property>
<name>yarn.nodemanager.vmem-check-enabled</name>
<value>true</value>
</property>
<property>
<name>yarn.nodemanager.pmem-check-enabled</name>
<value>true</value>
</property>
<property>
<name>yarn.nodemanager.vmem-pmem-ratio</name>
<value>2.1</value>
</property>
</configuration>
sudo nano mapred-site.xml.template

Save As: mapred-site.xml
<configuration>
<property>
<name>mapredreduce.job.tracker</name>
<value>rpi00:9001</value>
</property>
<property>
<name>mapred.framework.name</name>
<value>yarn</value>
</property>
<property>
<name>mapreduce.map.memory.mb</name>
<value>256</value>
</property>
<property>
<name>mapreduce.map.java.opts</name>
<value>-Xmx204m</value>
</property>
<property>
<name>mapreduce.map.cpu.vcores</name>
<value>2</value>
</property>
<property>
<name>mapreduce.reduce.memory.mb</name>
<value>128</value>
</property>
<property>
<name>mapreduce.reduce.java.opts</name>
<value>-Xmx102m</value>
</property>
<property>
<name>mapreduce.reduce.cpu.vcores</name>
<value>2</value>
</property>
<property>
<name>yarn.app.mapreduce.am.resource.mb</name>
<value>128</value>
</property>
<property>
<name>yarn.app.mapreduce.am.command-opts</name>
<value>-Xmx102m</value>
</property>
<property>
<name>yarn.app.mapreduce.am.resource.cpu-vcores</name>
<value>1</value>
</property>
<property>
<name>mapreduce.job.maps</name>
<value>4</value>
</property>
<property>
<name>mapreduce.job.reduces</name>
<value>4</value>
</property>
</configuration>
Hadoop Data File System (HDFS)
As part of the Hadoop installation HDFS is automatically added. A tmp folder needs to be created within HDFS to keep the temporary test data.
sudo mkdir /opt/hdfs/tmp
sudo chown hduser:hadoop /opt/hdfs/tmp
sudo chmod 750 /opt/hdfs/tmp
Add the slaves file
sudo nano /opt/hadoop/etc/hadoop/slaves
add :
rpi1
rpi2
rpi3
Copy SD Card
Use Win32imager or any other software of your choice to clone the sd-card. After clone ensure to configure each node with new hostname and ip-address.
Update Datanodes one at a time
Leave rpi0 off until all datanodes are setup
Plugin in SD card in (rpi1, then rpi2, then rpi3) and fire up your Pi’s.
Login in as pi
sudo raspi-config
Change the hostname (rpi1, rpi2, rpi3)
Change the IP Address
sudo nano /etc/dhcpcd.conf
Comment out the IP for rpi0 and uncomment the IP for rpi1. Repeat on rpi2, rpi3
interface eth0
#static ip_address=10.0.0.100/24
static ip_address=10.0.0.101/24
# static ip_address=10.0.0.102/24
# static ip_address=10.0.0.103/24
static routers=10.0.0.1
static domain_name_servers=10.0.0.1
Reboot – This concludes the setup of the slaves
Add the master file to the master rpi0 only
sudo nano /opt/hadoop/etc/hadoop/masters
add :
rpi0
Logon with ssh to all nodes from namenode (rpi1). Enter Yes when you get the “Host key verification failed message”. This is important in order for namenode to be able to communicate with the other nodes without entering a password.
Format the namenode (rpi0) and start the services
hdfs namenode -format
That will format the master as a proper namenode. Finally, start the services. Previously, Hadoop used the start-all.sh script for this, but it has been deprecated and the recommended method now is to use the start-<service>.sh scripts individually. In each node, go to /opt/hadoop/etc/hadoop/ and execute the following:
start-dfs.sh
start-yarn.sh
Verify the cluster
There are several ways to confirm that everything is running properly, for example, you can point your browser to http://rpi0:50070 (the http address configured earlier) or to http://rpi0:8088. There you can see status reports of the cluster.
Alternatively, you can also check the Java processes in the nodes. In the master node you should see at least 3 processes: NameNode, SecondaryNameNode and ResourceManager. In the slaves you should see only two: NodeManager and DataNode. My favorite way is to use the hdfs report command. This is the output report of my configuration:
hdfs dfsadmin -report
Configured Capacity: 182240477184 (169.72 GB)
Present Capacity: 153073315840 (142.56 GB)
DFS Remaining: 153073020928 (142.56 GB)
DFS Used: 294912 (288 KB)
DFS Used%: 0.00%
Under replicated blocks: 0
Blocks with corrupt replicas: 0
Missing blocks: 0
————————————————-
Live datanodes (4):
These strings copy the basic configuration to from the master to the slave nodes. You only need to do this if you make changes on the master to any of the xml files and want to replicate those changes to the slave nodes.
sudo rsync -avxP --rsync-path='/usr/bin/sudo /usr/bin/rsync' /opt/hadoop/etc/hadoop pi@rasp1:/opt/hadoop/etc/hadoop
sudo rsync -avxP --rsync-path='/usr/bin/sudo /usr/bin/rsync' /opt/hadoop/etc/hadoop pi@rasp1:/opt/hadoop/etc/hadoop
sudo rsync -avxP --rsync-path='/usr/bin/sudo /usr/bin/rsync' /opt/hadoop/etc/hadoop pi@rasp1:/opt/hadoop/etc/hadoop
References
Verduco, A. (2016, March 23). Building a Hadoop cluster with Raspberry Pi – developerWorks Recipes. Retrieved April 26, 2017, from https://developer.ibm.com/recipes/tutorials/building-a-hadoop-cluster-with-raspberry-pi/#r_overview
Widriksson, J. (2016). Raspberry PI 2 Hadoop 2 Cluster – Jonas Widriksson. Retrieved April 26, 2017, from http://www.widriksson.com/raspberry-pi-2-hadoop-2-cluster/